
How To Draw A Simple Realistic Face Howto Draw

10 Tips for Drawing a Face Art Starts

Learning how to draw faces better r/learnart

How to Draw the Face and Head in Perspective to Keep Correct

DO'S & DON'TS How To Draw A Face Step By Step Drawing Tutorial YouTube

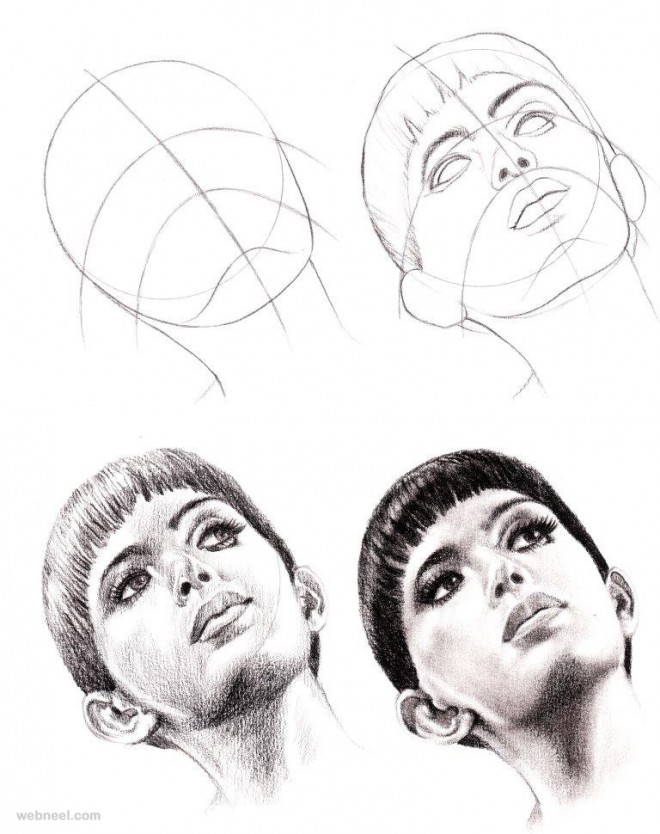
a pencil drawing of a woman's face
Web to draw a face looking down, you need to depict a person’s head, which is tilted slightly forward so that his eyes are directed downwards.
How to draw a face looking right. Web when learning how to draw a face you want to begin with any type of paper, you can use a 4b pencil, mechanical pencil, or any other kind of professional drawing pencil of your choice. As always, you don’t need to stick to the exact guidelines above. To draw a face we begin by sketching the basic proportions of the head and face.
Consider it a face proportion guide that will help you better grasp how to build a face. The area below the line should be used for the fuller, lower lip. Learn how to draw heads using the basic guidelines and then mix and match facial features and face proportions.
Although, if you want to learn more about. You can design various faces more confidently if you use this lesson as a face drawing reference. Web drawing a face in 3d involves:
After finishing that, add eye lashes. Firstly, we will look at the basic facial construction method using a few tools to guide us. The easiest way to do this is through the use of the equator line and lines of longitude.
Learn how to draw the front and side view of the. Web by analyzing millions of images, ai software can better predict how a body will look naked and fluidly overlay a face into a pornographic video, said gang wang, an expert in ai at the university. An inuit tribesman’s face, in particular.
First, you need to be drawing the inner and outer dark area of eyeball and then draw outline around eyelashes area. Drawing portraits can be challenging, whether you are a beginner or have some experience, so getting the right graphs and explanations is highly important. For tips on how to make a drawing look realistic, visit my blog post titled 6.

How To Draw Faces 3

How To Draw A Simple Person For Beginners Learn how to draw hands, a

How To Draw Real Faces, Draw Faces, Step by Step, Drawing Guide, by

How To Draw A Face 1 Preview

Creating with Kaiser Drawing Faces

How to Draw a Face 25 Step by Step Drawings and Video Tutorials

Human Face Drawing Easy In my Head

How To Draw A Face 25 Ways Drawing Made Easy

10 Tips for Drawing a Face Art Starts

How to Draw the Face and Head in Perspective to Keep Correct

How to Draw a Face 25 Step by Step Drawings and Video Tutorials

Drawing Faces 18

How to Draw Faces from the Side YouTube

